
Brewing recipe
This is my recommended recipe for espresso brews, of course depending on your equipment, water and technique. With my roast profiles, I make sure that this recipe works for all my coffees.
Brew ratio: 1 : 2.3
Dose: 20 grams (based on basket size; we use 20g VST baskets)
Yield: 46 grams
Temperature: 93 degrees Celsius
Pump pressure: around 9 bars for maximum flow rate
Brew time: around 27 seconds
I base this recipe on two things. Firstly, I wanted to taste all the flavour descriptors that I mention on our packaging in an espresso as well as in a filter brew. This means there should be no negative influence of the roast perceived, like roasty or other bitter flavours. Secondly, I wanted the brews to taste pleasant. As simply as that may seem, it is usually not the case with espressos as the acidity or bitters may be too intense, or the drink is just too strong. I personally enjoy espressos to be a bit lighter in texture, so I use a higher brew ratio than some others. I adjusted my roasting style to meet this 2.3 brew ratio demand.
All this together will make all my espressos transparent, sweet and silky; just the way I like it.
Dialling in a coffee for espresso can be tricky, especially because even a small mistake can ruin your coffee. In order to minimize waste, I have tried to give some indication of the desired grind size. Since everyone has a different setup, I cannot give one clear answer. However, because of my consistency in roasting, I can give grind size indications for our coffees relative to each other.
For the espresso quality control in the roastery, I use the Lagom 01 coffee grinder. Below, you will find a table with the grind sizes that I use with the espresso recipe mentioned above. These are regularly checked and calibrated. Lower numbers indicate a finer grind setting; higher numbers indicate a coarser grind. Please do not see this as indications for one single coffee. This table is meant to help you find the correct grind size of one coffee after having dialled in another.
For example, let’s say you have been brewing the Argote Natural at grind size 1.2, but now you have run out and open a bag of Keramo. This coffee will have to be ground a few steps coarser on any grinder. Even though 0.6 difference on the Lagom 01 may be one step on a different grinder, or perhaps 4 steps, at least you know it will have to be ground a little coarser. On the other hand, the Intango Natural requires just about the same grind size as the Argote Natural, regardless of the grinder you use. Once you get used to this, you may be able to convert our Lagom 01 settings to the corresponding settings on your own grinder!
Suke Quto: 1.3 | Keramo: 1.4 | Limmu Kossa: 1.2 | Kebede Wako: 1.2 | Girma Sentayehu: 1.4
Sironko: 1.2 | Amkeni: 1.1 | Gloria Natural: 1.4 | Gloria Ruby Washed: 1.5 | Kianamui: 1.3 | Sidra: 1.2
Argote Natural / Washed / Peaberry: 1.2
Argote Lactic / Anaerobic / Pink Bourbon / JPSS: 1.0
Gonzalo Castillo: 1.0 | Ana Restrepo: 1.2 | Fontana: 1.6 | Passeio: 1.5 | Bant Sawk: 0.8 | Churupampa: 1.0 | El Renacer: 1.1 | Huila decaf: 1.3
Mooleh Manay: 1.2 | Espana: 0.9 | Jose William Diaz: 1.2 | Mae Chedi: 0.9 | La Villa: 1.2 | Fausto Romo: 1.4
The Cafelat Robot is a great way to manually brew espresso. It actually tastes very similar to a “real” espresso and doesn’t need a lot of additional equipment. My recipe is based on our usual espresso recipe, but adjusted for the manual workflow.
Recipe 1 – recommended for milk beverages
Brew ratio: 1 : 2.3
Dose: 19 grams
Yield: 44 grams
Temperature: boiling water
Pressure: 9 bars
Brew time: around 35 seconds
Grind size: see chapter “Grind size”
- Start by pre-heating your portafilter with boiling water.
- Weigh and grind 19 grams of coffee. Pour this into the portafilter, shake for distribution and tamp. Add the protective mesh on top, or a paper filter (tamp again in this last case).
- Add 72 grams of water. The coffee will retain 1.5x its own weight in water, so this dose will result in a 44 grams yield.
- Insert the portafilter into the Robot and place a cup below.
- Start your timer and start brewing with only a little pressure as pre-infusion. You should see droplets appear at the bottom of the naked filter, but not fall in the cup.
- At 10 seconds, the pre-infusion should be complete and the first droplets of espresso should fall into your cup.
- Now, increase the pressure to 9 bars and press down all the way. Using this pressure, the espresso should be done around the 35 second mark.
Please note that if you find that you’re pressing too quickly, it means the grind size is too coarse or there is a bit of channeling occurring in the puck. In that case, it’s better to simply lower your pressure to decrease the flow rate and increase the brew time, rather than staying with 9 bars.
Recipe 2 – recommended for espressos
This second recipe can be a little easier to follow due to the lower pressure being used. Espresso made this way will taste a little softer and more delicate.
Brew ratio: 1 : 3
Dose: 18 grams
Yield: 54 grams
Temperature: boiling water
Pressure: 6 bars
Brew time: around 35 seconds
Grind size: see chapter “Grind size”
- Weigh and grind 18 grams of coffee. Pour this into the portafilter, shake for distribution and tamp. Add the protective mesh on top, or a paper filter (tamp again in this last case). There’s no need to pre-heat the portafilter for this recipe.
- Add 83 grams of boiling water. The coffee will retain about 1.5x its own weight in water, so this dose will result in a 54 grams yield.
- Insert the portafilter into the Robot and place a cup below.
- Start your timer and start brewing with only a little pressure as pre-infusion. You should see droplets appear at the bottom of the naked filter at the 10 second mark, but not fall in the cup.
- At 10 seconds, the pre-infusion is completed. Now, increase the pressure to 6 bars and press down all the way. Using this pressure, the espresso should be done around the 40 second mark.
- If you feel your flow rate increasing during the shot, it’s OK to lower your pressure a bit to stabilize the flow rate.
Recipe 3 – blooming espresso
This third recipe is a lot more difficult to apply correctly, but the results are definitely worth it. Your espresso will taste sweeter and creamier than ever, but will lose some of its funk and complexity.
Brew ratio: 1 : 3.0
Dose: 18 grams
Yield: 54 grams
Temperature: boiling water
Pump pressure: 6 bars
Brew time: around 1:10 minute
Grind size: see chapter “Grind size”. 3 steps finer on the Niche than usual.
- Weigh and grind 18 grams of coffee. Pour this into the portafilter, shake for distribution and tamp. Add the protective mesh on top, or a paper filter (tamp again in this last case). There’s no need to pre-heat the portafilter for this recipe.
- Add 83 grams of boiling water. The coffee will retain about 1.5x its own weight in water, so this dose will result in a 54 grams yield.
- Insert the portafilter into the Robot and place a cup below.
- Start your timer and start brewing with only a little pressure as pre-infusion. You should see droplets appear at the bottom of the naked filter at the 10 – 15 second mark, but not fall in the cup.
- Once you start seeing droplets appear, put no more pressure on the arms, but do not pull them up either. This would suck the coffee puck upwards and cause channeling.
- After 30 seconds of pausing (blooming), the pre-infusion is completed. Now, increase the pressure to 6 bars and press down all the way. Using this pressure, the espresso should be done around the 1:10 minute mark.
Recipe 4 – turbobloom
This recipe is very similar to the previous one, but has even less body and more intensity in its sweetness.
Brew ratio: 1 : 2.3
Dose: 18 grams
Yield: 42 grams
Temperature: boiling water
Pump pressure: 9 bars
Brew time: around 30 seconds
Grind size: see chapter “Grind size”. 1 step finer on the Niche than usual.
- Weigh and grind 18 grams of coffee. Pour this into the portafilter, shake for distribution and tamp. Add the protective mesh on top, or a paper filter (tamp again in this last case). There’s no need to pre-heat the portafilter for this recipe.
- Add 73 grams of boiling water. The coffee will retain about 1.5x its own weight in water, so this dose will result in a 45 grams yield.
- Insert the portafilter into the Robot and place a cup below.
- Start your timer and start brewing with 9 bars of pressure as pre-infusion. You should see droplets appear at the bottom of the naked filter at the 5 second mark, but not fall in the cup.
- Once you start seeing droplets appear, put no more pressure on the arms, but do not pull them up either. This would suck the coffee puck upwards and cause channeling.
- After 5 seconds of pausing (blooming), the pre-infusion is completed. Now, increase the pressure to 9 bars and press down all the way. Using this pressure, the espresso should be done around the 30 seconds mark.
It’s important in all coffee brews to reach a balance of flavours, but even more so in espresso, as small mistakes will dramatically change the flavour. In the specialty coffee scene, people are talking about extractions and even extraction values every day. These values have made it easier to compare brewing recipes and to check one’s consistency.
In the 50s, the Coffee Brewing Institute determined the ideal extraction percentage to be 18 to 22 percent. This was later confirmed by the SCAA and it became a benchmark for many professionals. Extractions below 18% tended to taste sour and sharp and were considered underextracted. Extractions above 22% were considered overextracted as they tasted bitter and astringent. Lately, though, with new improvements in equipment and techniques, people have found coffees outside these values to still taste great.
Now why does coffee taste sour at low extraction values? This all has to do with the composition of coffee particles. They don’t contain one specific flavour, but a compound of many different solubles. These can generally be categorized into two groups.
- Acids: there are many different types of acids, like lactic acids, malic acids, phosphoric acids, etc. These tend to give each coffee its characteristic fruity, floral or bright flavours. Acids can be extracted really quickly.
- Bitters: these are created by the roasting process. The darker one’s roast, the more bitters (and less acids) the coffee will contain. These flavours are extracted relatively slowly.
Since acids dissolve a lot quicker in water than bitters, an espresso with a low extraction value will mostly contain acids. On the other hand, an overextracted coffee will contain too many bitters. The goal is for these two groups to balance each other out and result in a sweet, balanced cup.
Research by Jim Schulman shows that a darker roast coffee gets more bitter more quickly at high extraction values than lighter roast coffee (see graph below). In a way, this is logical, as a lighter roast contains more acids and will therefore have more components to counterbalance any extra bitterness that is extracted.
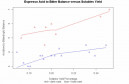
Given this balance between acids and bitters in a lighter roast, we need to extract more to create a balance. This is usually done with higher brew ratios, about which you can read more below. These higher extraction values usually also need better techniques and equipment to prevent overextraction flavours.
Even within one single espresso you can taste the different stages of extraction components. Try dividing an espresso into 3 cups, with one cup containing the first 9 seconds of the shot, the second cup the middle 9 seconds and the last cup the final 9 seconds. The first one will taste acidic and sharp, as most of what it contains are acids. The second one will be most comparable to a normal espresso, but just a bit weaker. The third one will taste watery and bitter, as most acidity is already gone and all that’s left to be extracted is bitters. As one extracts flavour from coffee, the rate at which extraction continues slows down.

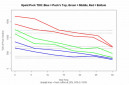
The less flavour remaining in coffee particles, the slower they will be extracted. This leads to an interesting concept about percolation. Try seeing the coffee puck as a cylinder through which the water passes top-down. At the top of the puck, the extraction rate is highest as the coffee contains all its flavour, but the water contains none yet (Fick’s first law of diffusion). As the water travels down and simultaneously extracts flavour, the rate at which it keeps on extracting slows down, because the water is getting more and more saturated. This means that the bottom of the coffee puck will have a harder time giving off flavour than the top part of the puck. This concept is depicted in the graph below, where a puck was sliced into three parts and each part’s extraction values were measured individually.
My hypothesis in this regard is that a thinner puck will create a more even extraction than a thicker puck, since there will be a smaller diffusion gradient difference. In practice, I do find that smaller pucks (lower doses) result in a sweeter coffee with more body (higher extractions), whereas increasing a dose (and therefore increasing the puck size) leads to more acidic coffees (lower extractions). However, some espresso machines, especially ones without pre-infusion, can cause channeling more easily on thinner pucks. In addition, smaller pucks have to be ground finer than larger pucks to create the same level of resistance and therefore get the same shot time. Grinding finer sometimes makes the grind distribution more equal, but some grinders may have trouble grinding so fine and then create inconsistencies. There are multiple variables to consider before applying this theory.
So, should all this theory be applied into practise? To determine extraction values and create recipes, weighing is key. The most important determining factor of a coffee extraction is the brew ratio: the ratio between ground coffee and beverage yield. The table below shows generic indications of a recommended brew ratio for diffferent beverages.
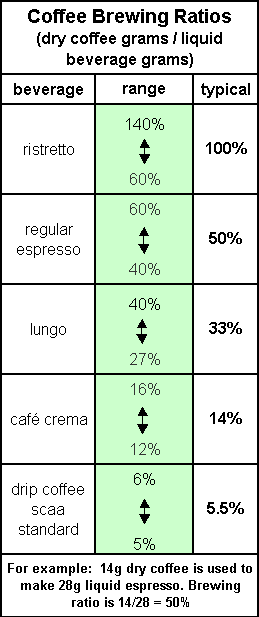
This values are very culturally and trend dependent. For example, in the Netherlands, five years ago most coffee bars brewed espressos with a 1 : 1.8 ratio or even shorter. Nowadays, people tend to stick to a 1 : 2 ratio or slightly higher. This is partly due to the trend of people preferring more easy going drinks than very intense ones. Another reason is that roasters have gotten better at light roasts, for which higher brew ratios are necessary.
When dialling in a coffee, I recommend to start by looking at the filter basket one uses. You can read more about filter basket below. Each filter basket has its own size and therewith a recommended coffee dose. Standardizing this dose makes it a lot easier to compare preferred brew ratios between different coffees, roasters or even batches. It is also simply more easy to work with, both at home and in a cafe setting. Only when one has reached a sweet, balanced extraction with a certain brew ratio is when one should consider changing this dose. As mentioned above, a lower dose may increase a coffee’s body, but if one wants to make their espresso more juicy and bright, one might consider using a higher dose. It is very important to keep the brew ratio the same when changing the dose, as otherwise it will create a lot of confusion.
I often get calls from people having difficulties with their espresso recipes or taste descriptions. “The coffee seems to taste different than when I brew it in my shop, how come?” Obviously there are a million variables that affect this flavour composition. However, one of the first things I check when I inspect an espresso machine is the portafilter basket.
There are different basket sizes used for different dosing quantities. VST, one of the most prominent basket manufacturers, named theirs by recommended weight, though this of course depends on the bean density. These sizes are 15 grams, 18 grams, 20 grams (competition basket) and 22 grams. Generally, most people use the 18 grams or 20 grams baskets. Larger baskets have a larger hole area to allow for similar shot times despite a higher dose. Since VST baskets are laser-perforated and extensively checked, their deviation is quite small (+- 4%) compared to other baskets (+-15%). The chart below shows a comparison between regular La Marzocco baskets and VST baskets.
| Model | Base diam | Hole avg | sd | Hole area | Shape |
| LM do 1 | 430 | 401.9 | 50.7 | 81.9 | S |
| LM do 2 | 430 | 409.9 | 46.3 | 85.0 | S |
| VST 15 | 494 | 310.6 | 14.3 | 54.3 | H |
| VST 18 | 494 | 351.2 | 9.8 | 69.3 | H |
| VST 22 | 494 | 377.1 | 15.4 | 80.0 | H |
IMS, the other main brand of baskets, simply used the height as the size indication. Their sizes are 24mm, 26mm and 28mm. Comparing this to VST, one could say these three sizes to be 18 grams, 20 grams and 22 grams.

Even though numerous studies have already been done comparing these basket types, I wanted to experience these differences for myself. I prefer to take a taste-based approach rather than measuring. I brewed espressos with all filter baskets available and compared dosing potential, shot times, extraction balance and mouthfeel.
The perforation area of IMS baskets seemed a bit larger since shot times dropped from 28 seconds to 24 seconds when switching from a VST basket to the corresponding IMS basket. This means I could grind finer with the IMS baskets for the same shot time. However, flavour-wise VST baskets seemed to produce higher extractions.
Furthermore, IMS baskets seemed to produce more clarity and a juicy body in the coffee. VST, on the other hand, gave more body and sweetness. Upon cleaning the portafilter after brewing a shot, I found the IMS baskets to contain more oils than the VST baskets. This might be the reason for this difference in mouthfeel, since those oils would give an espresso more body.
Conclusively, I think IMS filter baskets are definitely something to consider; preferably H26 since it allows for 19 – 20 grams dosing which is a generic espresso dose. A customer of mine did not recognize the coffee (pulped natural Brazilian yellow Bourbon) she used in her shop when I brewed it with a VST basket. However, when I switched to the H26 IMS basket that she uses, it was pretty much the same beverage she serves. Of course VST baskets have proven themselves to give high, consistent extractions and should also be considered. There’s no best, but there are certainly huge differences, and one should base one’s decision on the taste preference of the person for whom the coffee will be brewed.
Pressure profiling used to be quite the thing as only a few machines were advanced enough for this feature. Nowadays, the technique is more widely accessible, but people seem to be in two minds about it. I’d like to go into more detail about how pressure profiling can be used, and how changing a stable brew pressure may affect your espresso brew.
Pre infusion
Pre infusion is probably the most widely available pressure profiling paramter nowadays. Some machines have the option of hard pre infusion, where the group head releases water at the main infusion pressure, pauses for a certain amount of time, and then continues to brew. Soft pre infusion, on the other hand, means a gradual increase in brew pressure. Hard pre infusion is something I tend not to recommend because it covers part of the acidity of a coffee, which should be something unique and pleasant if the coffee is well roasted. However, some experiments with extreme hard pre infusions have produced very funky and delicious brews. I will elaborate more on this in a different journal entry.
Soft pre infusion is a tricky thing. A gradual increase in pressure means less channeling from the start of the shot when using low doses. It also allows the fines in your puck to get more settled, resulting in an increased flow rate afterwards which is desirable. This is one of the things that makes a Slayer espresso machine capable of very high extractions.
I personally think that soft pre infusion can definitely help with some coffees that are a bit too harsh or difficult to extract, but it should not be necessary. It gives you more freedom in the coffees you choose, more freedom in brewing recipes and more leniency in techniques. So in a way, this innovative technique that only recently became almost standard in high-end espresso machines is mostly suitable for users that use mediocre coffee or have unskilled baristas working.
Main infusion
Since pressure influences the speed of your extraction, it is only logical that a higher brew pressure should lead to quicker extraction. However, extraction speed is not the only thing we go for when brewing espressos. One of the things about espresso is that a regular brew should not take more than roughly 30 seconds, since after that time the core of the coffee particles will start giving off flavours, disturbing your total extraction. We therefore generally try to extract as much as possible within 30 seconds without inducing off flavours.
For regular espresso brews, I recommend using a brew pressure that gives the highest flow rate. This allows you to grind finer to reach the 28 – 30 second mark and therefore increases your extraction potential and evenness. You will notice that as the pressure increases, your flow rate increases, but only up to a certain point. Generally, from 9 bars and up, the initial water flow puts so much pressure on the coffee puck, that the resistance is actually increased. If you measure shot times with varying brew pressures, you may find results similar to the following table:
| Pump pressure in bars | Average shot (30 sec) mass in grams |
| 7,5 | 30 |
| 8 | 33 |
| 8,5 | 35 |
| 9 | 31 |
From this experiment, you can see that brewing at 8.5 bars gave a higher flow rate than brewing at 9 bars. You can take this into as much detail as possible to reach an optimal brew pressure.
Of course, working on lower brew pressure is also an option. For some coffees, this may result in completely new flavour profiles or a smoother body. However, a brew should generally only become better at these pressures if there’s something wrong with the coffee or the roast. For instance, a flicked roast may have some harsh, bitter flavours that can be reduced down by working at a lower pump pressure. A well-roasted, high-quality coffee, however, should usually be extracted as highly as possible, which requires a higher pump pressure.
Post infusion
Lowering the pump pressure at the end of your shot may create a bit more evenness and less perceived bitters in the cup. The last bit of water tends to extract mostly bitter flavours, and extracting these less efficiently (with a lower pressure) will cause fewer bitters to be extracted. Also, at the end of your shot, the coffee puck tends to have withered so much that to a certain extent, channeling is already happening. This leads to increased and uneven flow rates. A lower pump pressure may reduce the impact this has on the brew quality.
As a generic guideline, one can assume that a stable flow rate throughout the entire espresso shot is best. Tests with the Decent Espresso Machine and the Sanremo Opera have produced stellar quality brews with this hypothesis. Moreover, it creates more uniformity between shots, making it easier to dial in a coffee.
From a visual perspective, an espresso is easily recognizable by its beautiful layer of crema. There are a couple of factors that together allow for this creamy layer to exist on an espresso brew.
One of these is the pressure under which the water is pressed through the coffee. This pressure allows for the water to take in more CO2 than it would under atmospheric pressure. Thousands of miniscule bubbles are created as soon as the liquid leaves the portafilter. In the cup, these spread out and create a top layer, comparable to what beer does upon being drafted. This is one reason why espresso brewed with a low pump pressure has less crema than usual. Very freshly roasted coffee will get a thicker layer of crema, as the beans still contain more CO2 than after a few days of degassing. Similarly, darker roasted coffee will also have more crema as it contains more CO2 than light roast coffee. Finally, a naked portafilter will also leave more crema, as a regular portafilter will retain some of it in the portafilter and along the spouts.
This explains the factors determining the amount of crema, but not the consistency and actual existence of crema. Compare it to opening a soda bottle: the foam is very bubbly and thin and disappears rather quickly. To keep foam intact longer and stronger, one needs a surfactant.
When steaming milk, proteins are the surfactant, keeping the foam together. In an espresso brew, it is a different substance: melanoidin. It is a hydrophobe substance created by Maillard reactions during the roasting process. Hydrophobe means the substance does not bind itself to water but actually seems to repel from it, and bind itself to air. In the case of an espresso, the melanoidin traps air and prevents it from dissipating quickly by separating it from the liquid below.
Apart from CO2, coffee contains another non-polar substance: oil. Melanoidin is attracted by this oil and will therefore after some time release the trapped air. This is one of the causes for the dissipation of crema after a few minutes. Another is drainage. Melanoidin only has so much strength to keep air trapped, and will over time dissolve in water, releasing the air.
This drainage is the cause for long blacks to lose their crema much more rapidly, and for espressos with high flow rates to also retain less crema. The more the crema gets in contact with water, for example by stirring or swirling, the quicker it dissolves.
Sometimes, a layer of crema has dark brown or red spots on top of the golden-brown: a tiger print. These are ultrafine coffee particles that have travelled through the filter basket. The darker a coffee is roasted, the darker the tiger print will be.